

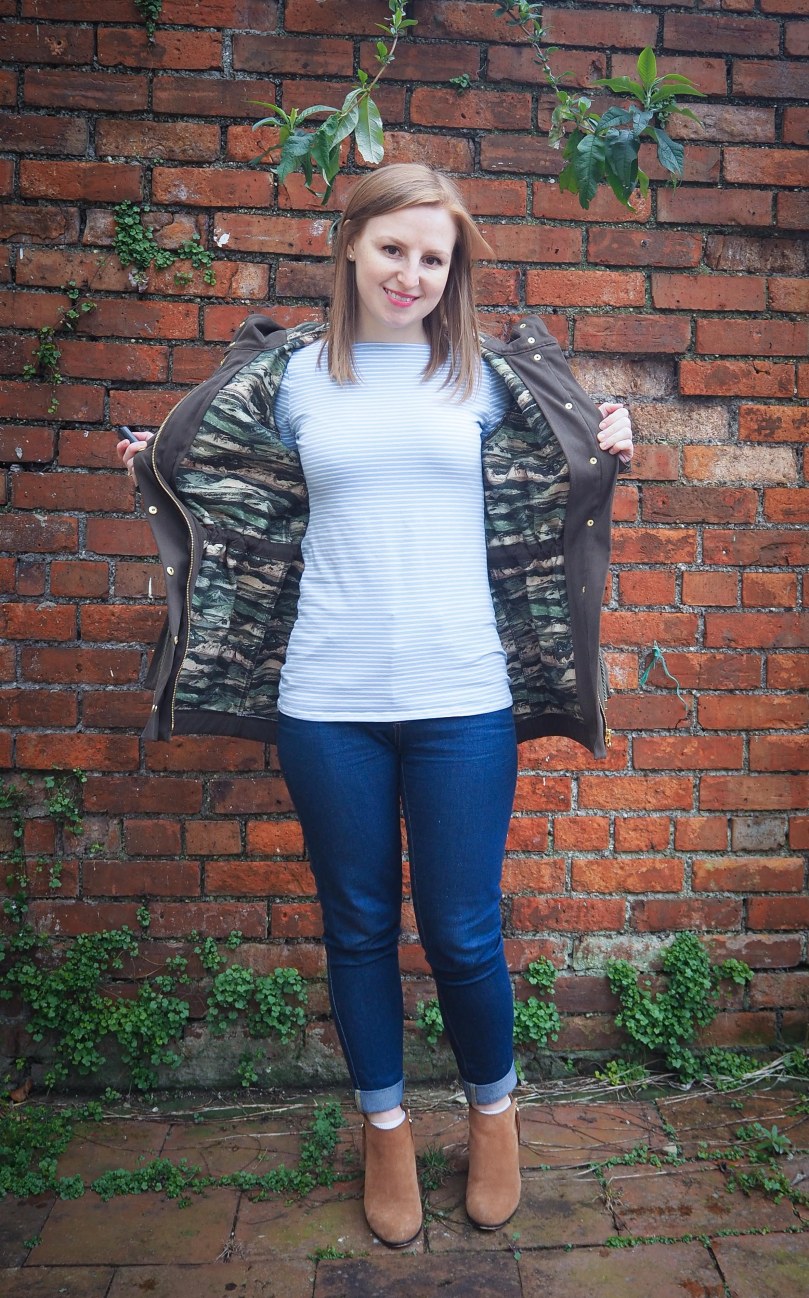
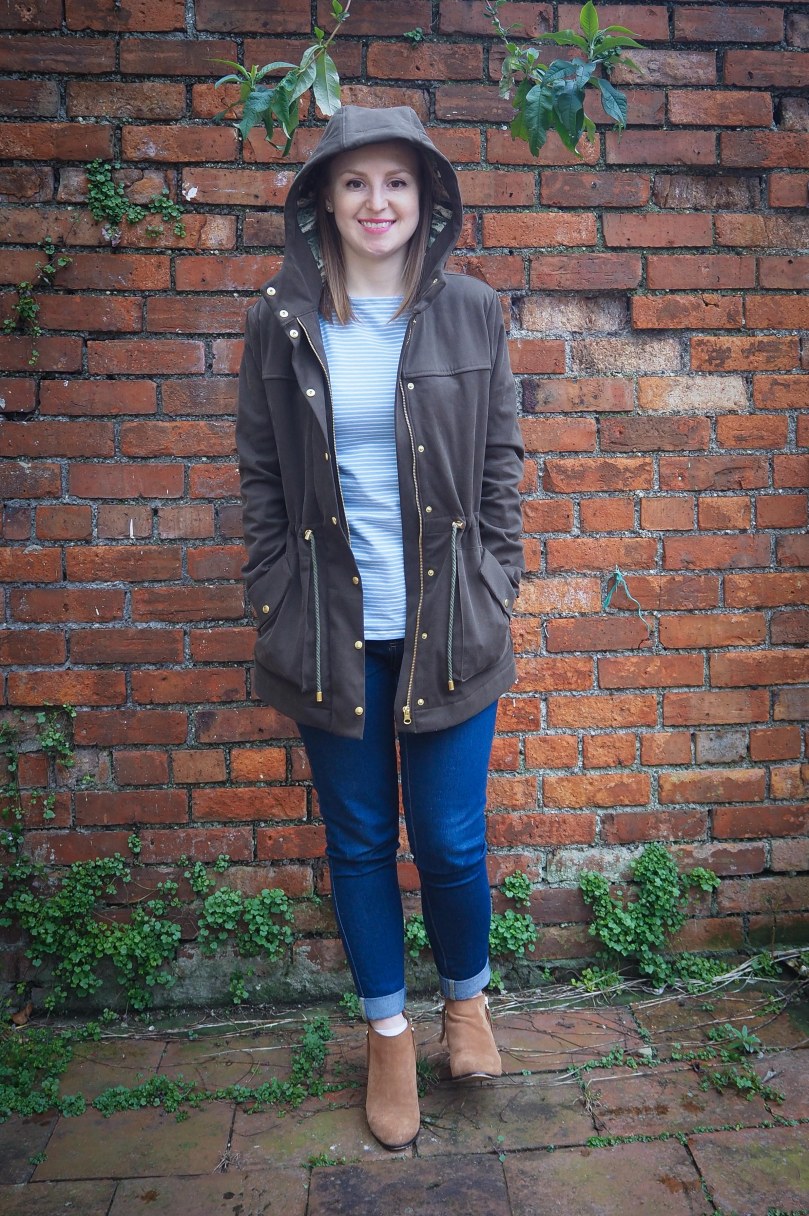
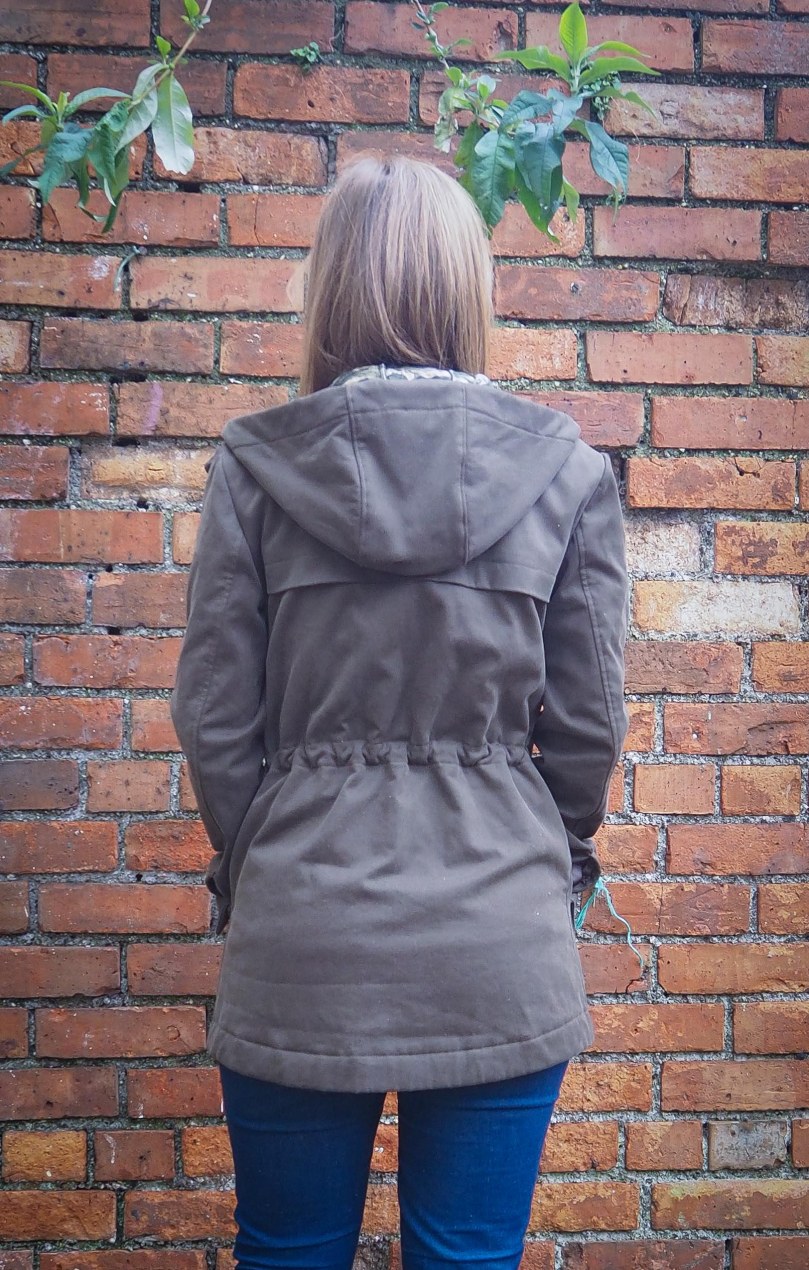
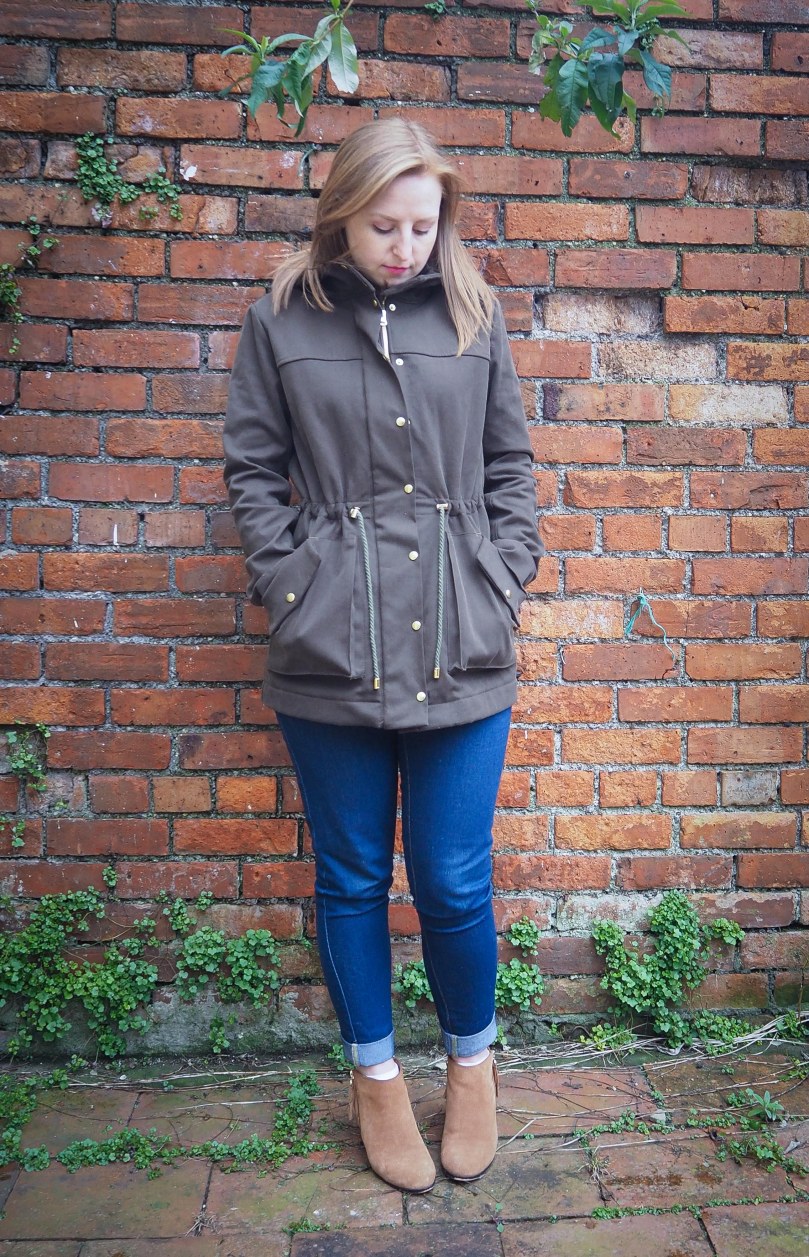
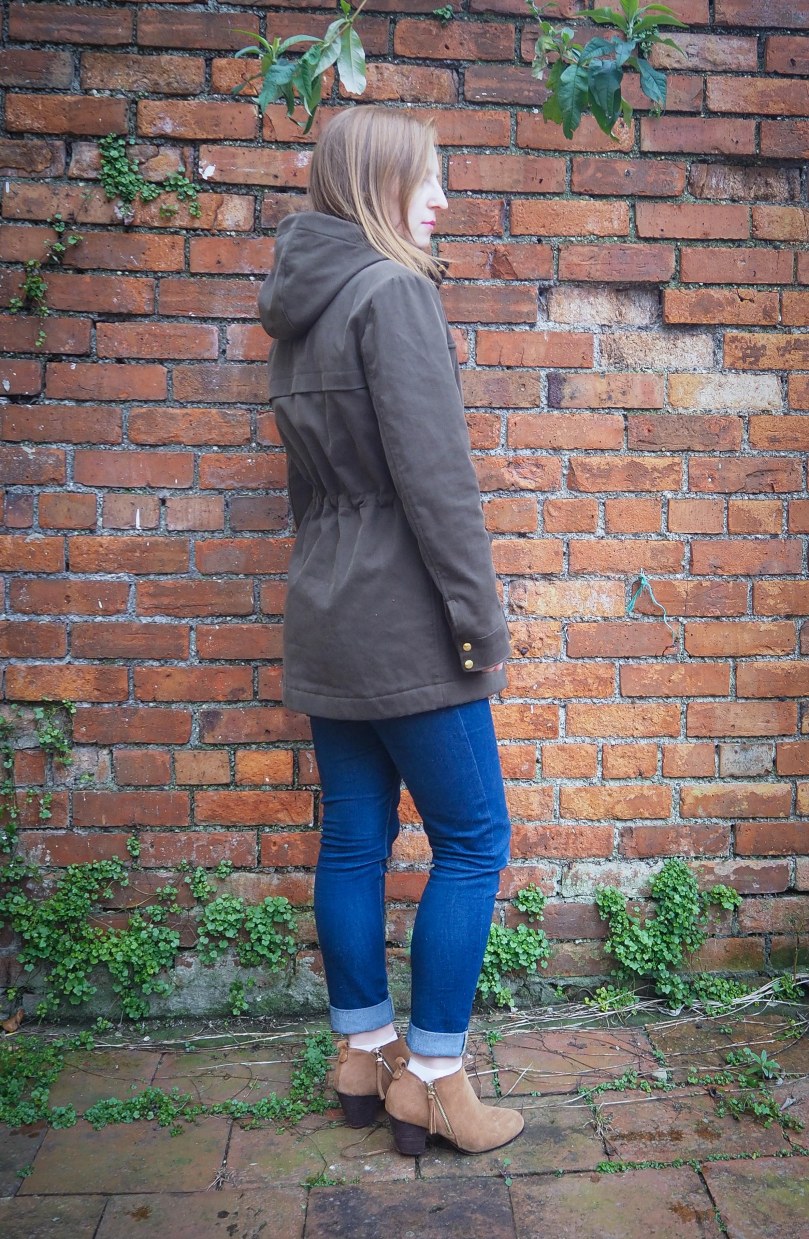
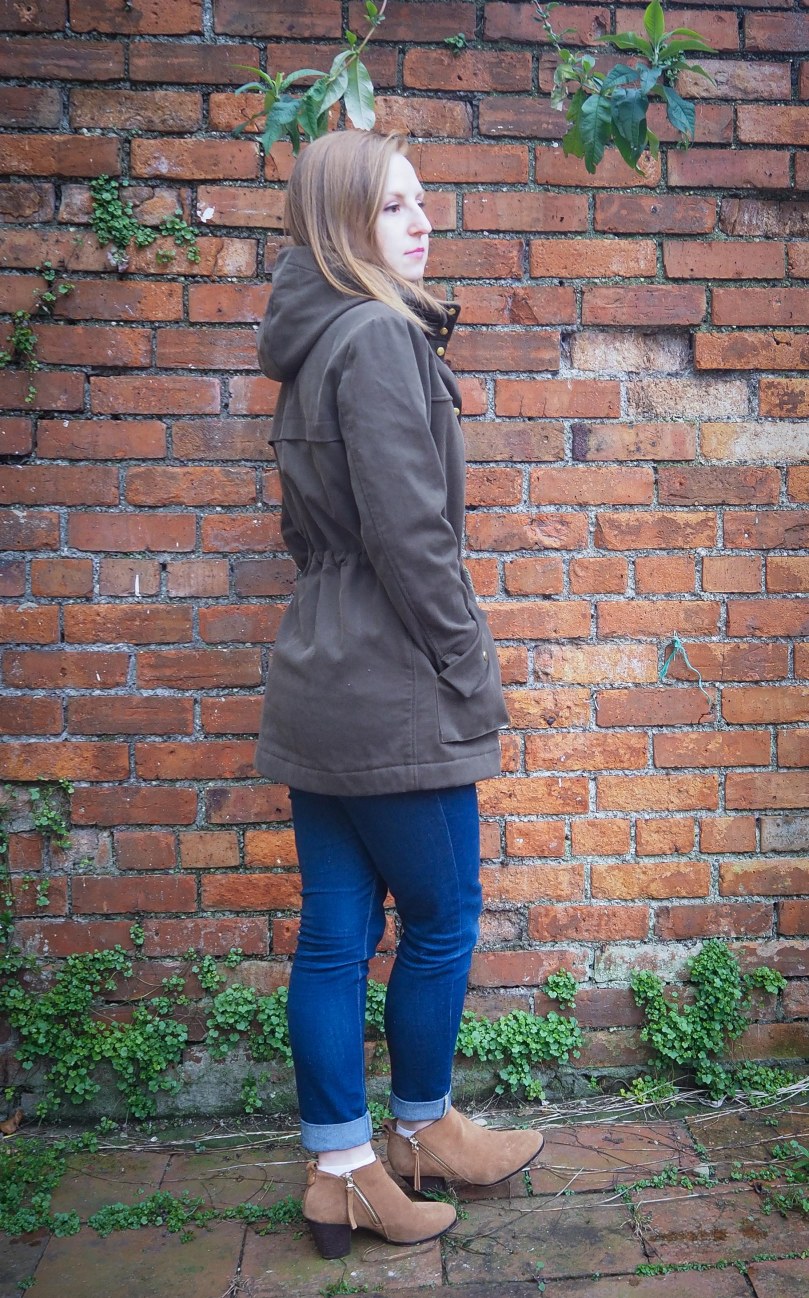
Perhaps you’re as surprised as I am to learn I’ve already finished one of the beefier makes on my 2017 Make Nine list; the Closet Case Patterns Kelly Anorak but finished she is and I’m very pleased with the result! The first thing I should say is these photos make it look brown. It really is more of an olive in real life. My camera apparently really wanted it to be brown. I considered retaking the photos but when life gives you brown…?
I’ve seen so many great versions, like lladybird Lauren’s version, Georgia of Ginger Stitch’s waxed version and all of those in Heather Lou’s round up. A good number of them — including those linked — have been in the green colour palette so I feel like a little bit of a copy cat but if it’s not broke, eh? OK, picture time! Here, I’m wearing my Closest Case Patterns Ginger Jeans and a Grainline Studio Lark Tee.

And let’s get stuck into the details.
It took a little while to identify and collect all of the supplies I wanted (and the lining fabric actually). It was really important to me that they matched but it meant I had to get them from a few different places, which is why I wanted to share them with you here.
Fabric and Supplies
- Outer fabric: Brexit brushed cotton twill in Dark Olive, Croft Mill £7 per metre
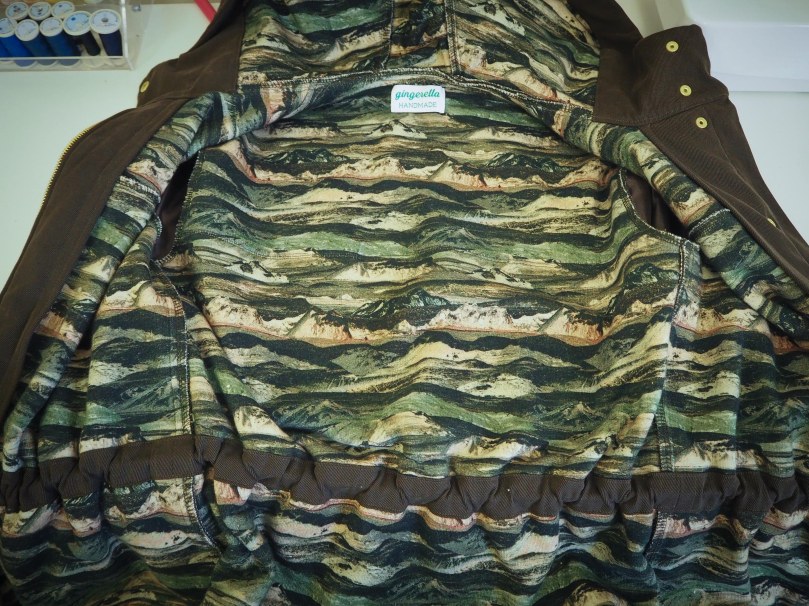
- Lining fabric for body and hood: Liberty Cotton Linford Fleece in Manning, ebay seller washable fabrics £21 per metre
- Lining fabric for sleeves: Habutae Faux Silk Fabric (brown), Fabric Land, £1.09 per metre
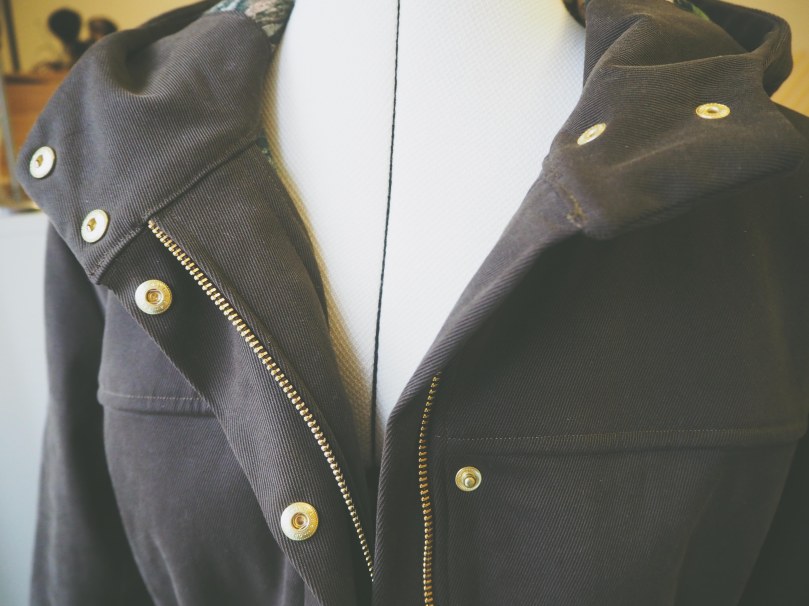
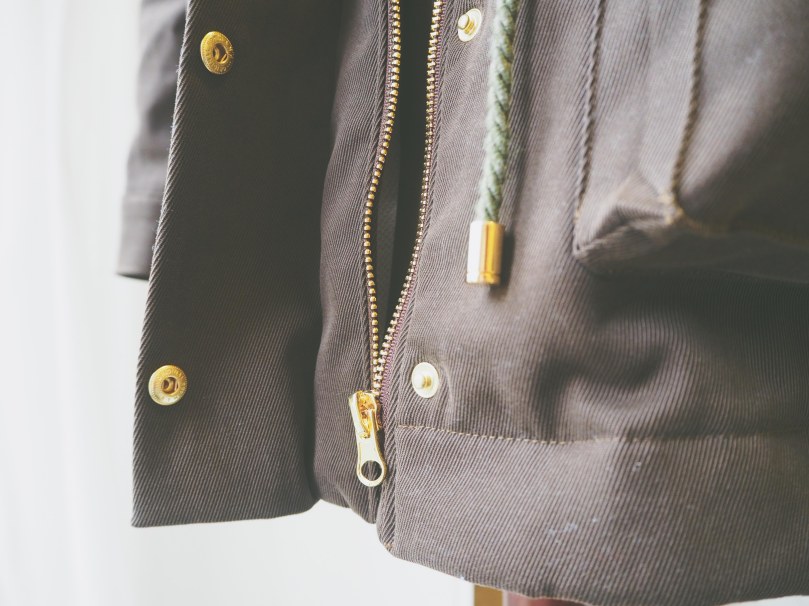
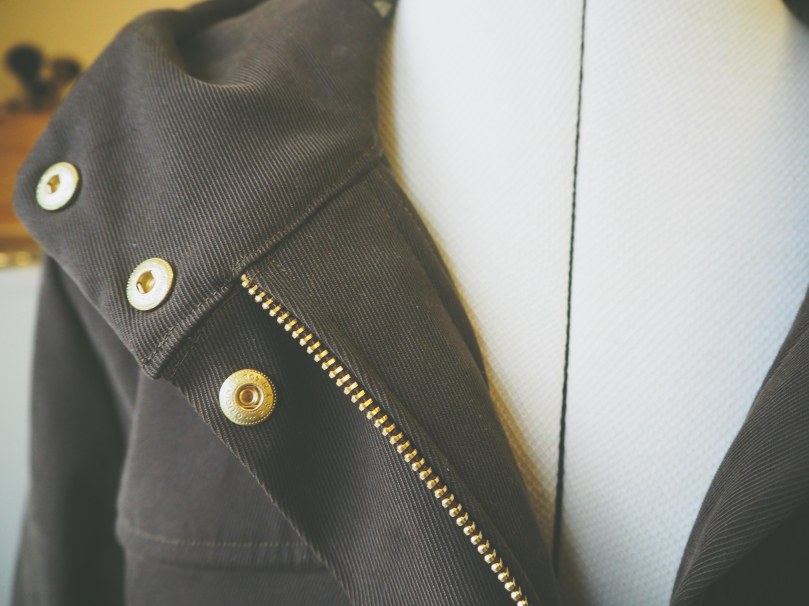
- Zipper: Bright brass metal 26″ open ended zip (dark brown), ebay seller pro-sew-darlington £3.40
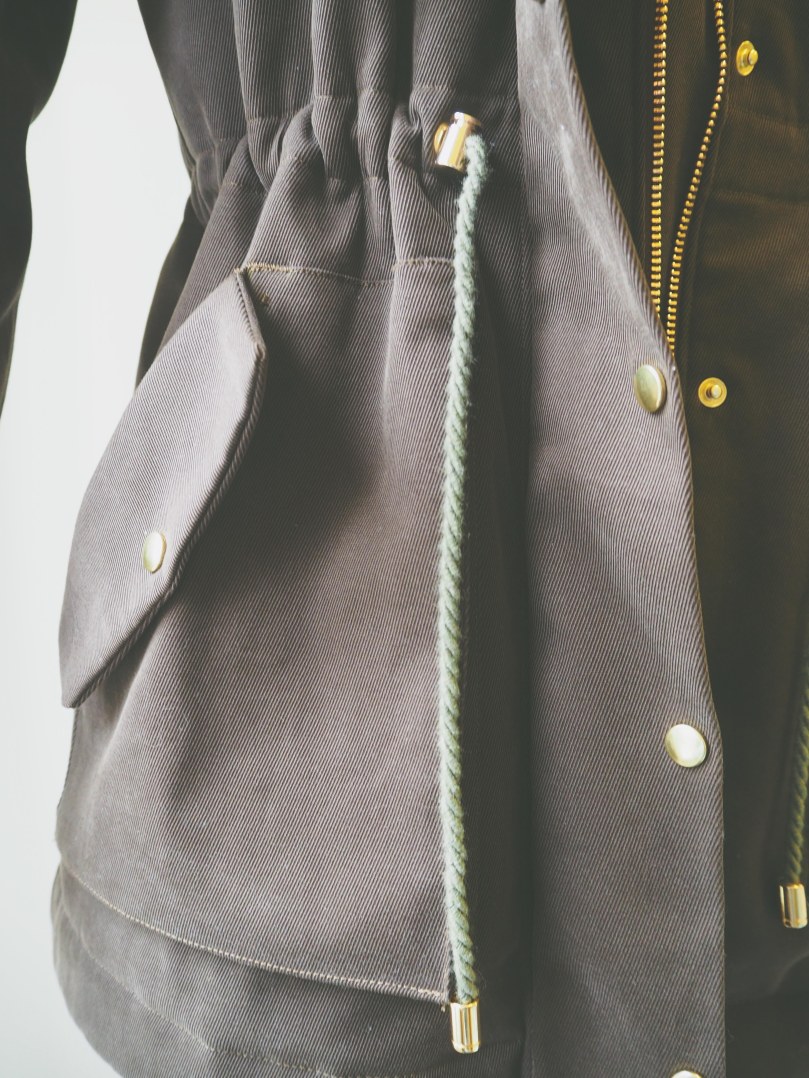
- Snaps: Prym 12mm no-sew gold metal snaps, Jaycotts £6.50 for 10
- Eyelets: Prym 5mm no-sew gold eyelets, Jaycotts £5.10 for 40
- Drawstring: 5mm cotton cord (olive) MacCulloch and Wallis £1.10 per metre
- Cord ends: gold cord ends with screw for 5/6mm cord MacCulloch and Wallis £2.10 each
- Cord toggles: gold plastic spring toggles minerva crafts on ebay £2.49 each
Sizing and cutting
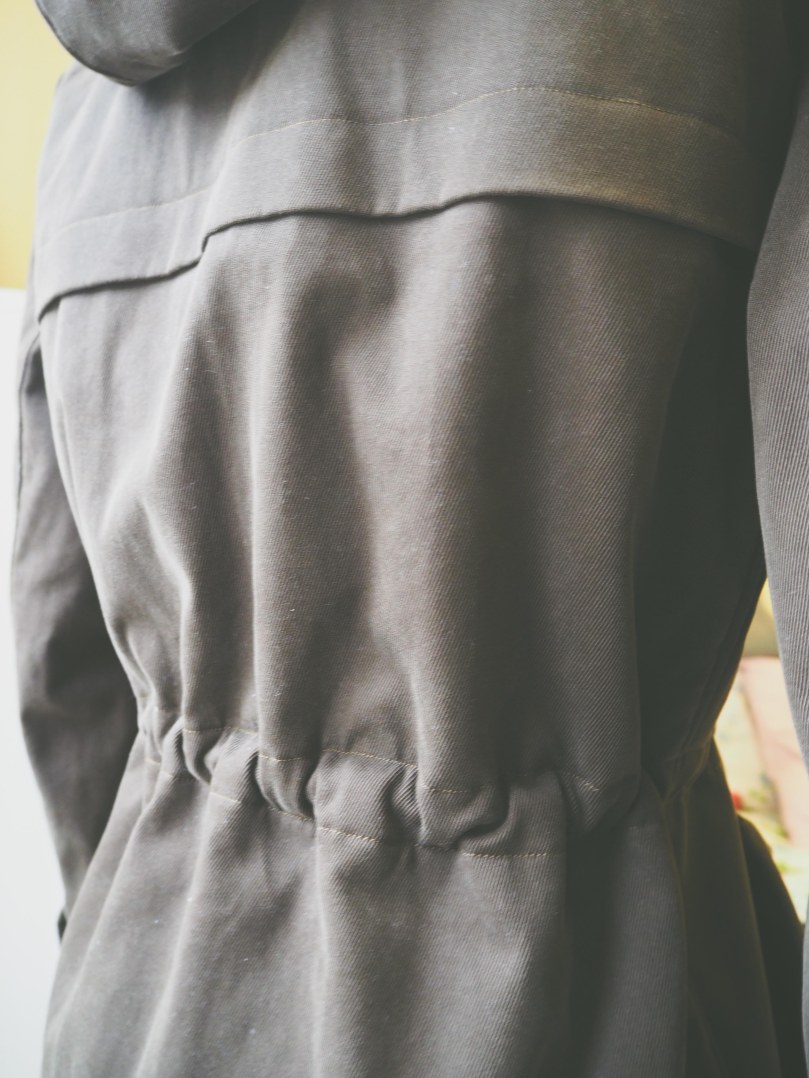
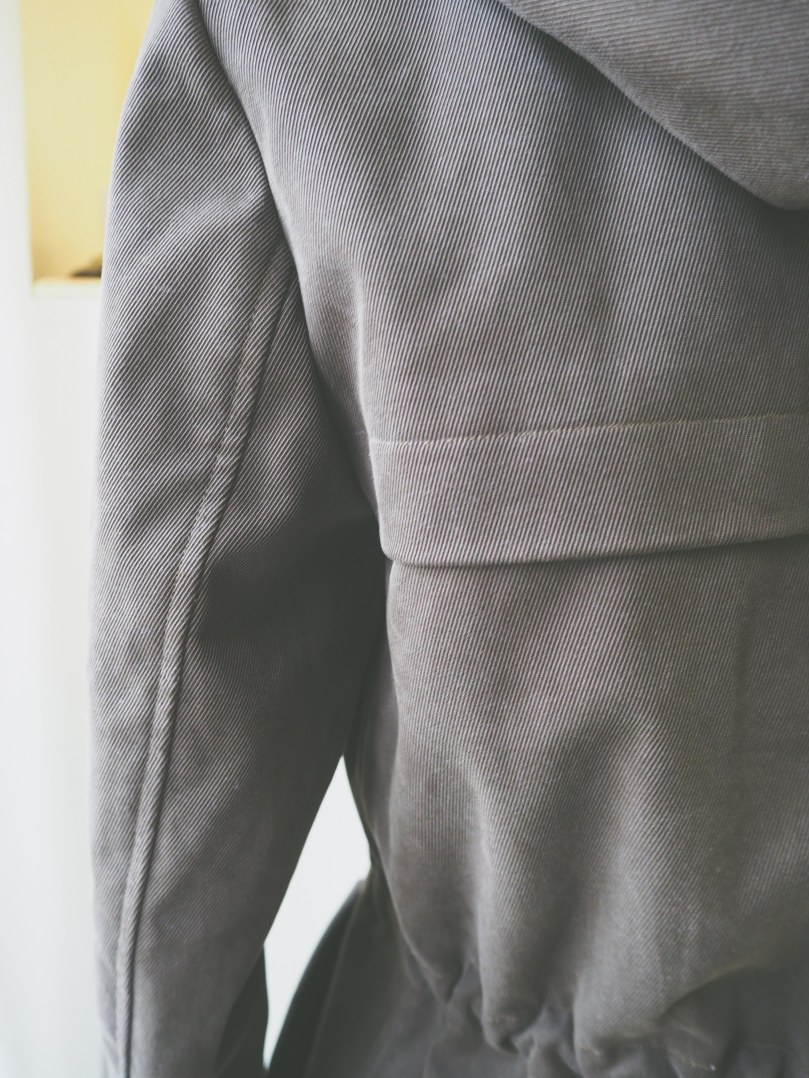
I made View A with the hood and drawstring, and cut a size 6 all over, despite my hips fitting into an 8 or 10. I made no adjustments prior to cutting out but did also cut out fleece interlining for pieces A, B, C, P and Q, following Heather Lou’s tutorial for this. For the sleeve pieces (E, F) I was originally just going to underline with silky lining fabric — so you can easily get it on and off — but was concerned that may mean my arms would be cold. So I added some lightweight winceyette lying in my stash (so was a completely unmatching blue flowery fabric but you can’t see it) between the outer fabric and the slippery lining. Works a treat.
Fitting and alterations
No alternations were made in terms of fit, the only two changes I made were for the hardware:
- Moved the eyelets and drawstring casing at the waist down by 1.25″ after trying on.
- Added an extra snap to each cuff so there were two instead of just the one. For this, it was necessary to trim the cuff seam allowances around the corner more to ensure the snap isn’t trying to go through too much fabric. Sadly, I didn’t do this before I’d sewn the cuffs up so had to unpick the topstitching here and I’m yet to topstitch them back down (it might be tricky with the snaps now in, but we’ll see!).
Pattern instructions
The instructions for the most part were great! And having Heather Lou’s tutorials for the trickier elements was so helpful, especially the gusset pockets as I’d not sewn those before. Whereas I had some experience of plackets from when I’d sewn my Sewaholic Minoru jacket.
Similar to lladybird Lauren’s experience, there were a couple of points in the instructions where I got a little confused, or there was a discrepancy between seam allowances in the instruction booklet and the online tutorials. Whilst it didn’t really change the outcome this may be because I’ve had experience of sewing coats/jackets before and I’m not sure what the effect might be for someone new to this sort of garment.
Finally, the envelope back of my printed pattern says you need 2 metal snap buttons, but you need 12, and it is actually correct in the instructions, so I’m guessing the 1 has just been accidentally deleted at some point.
Finishing
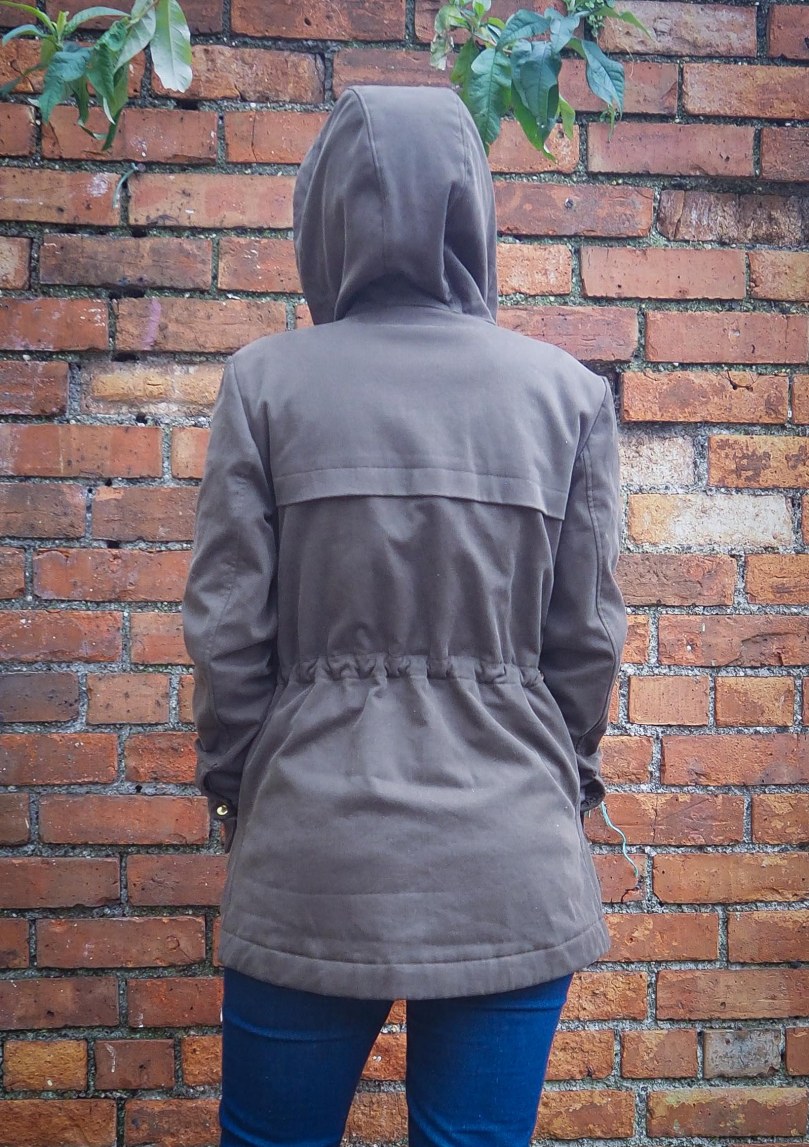
For the most part, I did a faux flat fell seam as the interlining made it too thick to do genuine flat felled seams here. Heather Lou’s tutorials talk you through this as well. It does mean the insides aren’t quite as nicely finished as they might be but it’s so effing warm! So I’m happy to take the hit.
The snaps were actually quite a joy to fit, using a Clover Straight Tailor’s Awl and my Prym Vario pliers. Both the eyelets and snaps come with the right attachments so all you need to do is swap them. Seriously, those pliers felt like one of my best investments during this make! But you can also fit all of the hardware using the kit that’s supplied in each pack, i.e. without having to buy the pliers.
Verdict
She’s now my main squeeze. Yup! Replacing my RTW four year old navy duffle coat from Topshop. That’s a winner. And did I mention how bloody warm it is?! This is something I especially notice because, despite lining my Minoru, it really is not warm. Oh and Kelly’s hood stays on (albeit whilst squashing my hair!), which the Minoru hood doesn’t do either. I’m not the most happy with the colour of the drawstring: it’s too green, but I’m nitpicking here.
There are some things I would change for future versions (I really want to sew a lighter, navy version):
- Make the snap of the gusset pocket functioning. Right now, it’s just a snap between the flap and the outside of the pocket fabric. This means I’m a little concerned about pocket contents slipping out and I can feel the back of the snap when I put my hand in the pocket. Another blogger pointed out the latter (sadly their domain no longer works so I can’t link to the post) but I ignored it as I didn’t think it would be much of an issue. It’s not major but it is a niggle. The snaps can certainly go through a few layers of fabric so I’d create a real closing pocket.
- Add an internal pocket of some kind as I really like this feature of my Minoru. Although this would only work for a lined version, otherwise you’d see the stitching from the outside.
- Reduce the width of the left facing? Similarly to lladybird Lauren’s experience once more, the facing on the left side of the zipper (as you’re wearing it) is too wide for my liking, and it flaps open a little to reveal the interfaced inside. So I may handsew it down in the current version. But for future versions, I’d look into whether it needs to be that wide in the first place and if it can be reduced.
Working on…
MONETA PARTY! It’s the weekend and the next thing on my cutting table (read: floor) is my Moneta. Sew exciting! Oh and my vlogs of course.
What are you working on? Are you taking part in the #MonetaParty?

You’re jacket looks amazing! So professional! I especially love the lining you used. Looks fab!
LikeLike
Beautiful job! I have this pattern on my spring sewing list, so thank you for all the great photos and tips. I’m thinking that I might use toggles and loops instead of snaps, but aside from the main fabric everything is still undecided. Although I hadn’t thought about what that would mean for possible pocket closures… enjoy your jacket!
LikeLike
Looks awesome – and can def see that it’s green! Fits you perfectly. THUMBS UP 🙂
LikeLike
You’ve done a great job on this. It looks amazing! I bet you’re pleased you’ve made a dent in the Make Nine list too.
LikeLike
It looks so cosy and warm. I love the lining fabric you chose and the list of suppliers is so helpful and will save a lot of time. I also think an internal pocket would be a great addition too.
LikeLike
Looks great! Will you be at Sewn this afternoon? I’d love to see the jacket close up 🙂 And see you too, naturally!
LikeLike
Your Jacket looks amazing. This is on my wish list..but I think it will be a while before I feel confident enough to tackle it!! x
LikeLike
Gorgeous! I’m still on the hunt for the right fabric for my Kelly!
LikeLike
I love this pattern. I have seen lots of great versions of it. I’ve got to put it on my “sewing to do” list!
LikeLike
Wow Jen!! That is really amazing, job well done!! I love it! x
LikeLike
This is fabulous Jen, really like the choices of fabrics you have used. Thanks for all the details of the make, will be useful to refer back to😊
LikeLike
This is amazing! Congratulations on making such a fantastic coat! And thanks for putting a list of all the suppliers – I think that will be very useful for anyone else wanting to make one.
LikeLike
The coat is beautiful, you should be really proud. I’ve got my eye on this pattern for next winter, thanks for linking the supplies.
LikeLike
Wowsers!! Your coat is amazing! You did a brilliant job.
LikeLike
Thank you so much for such a detailed and helpful review – collecting the supplies together has really put me off starting a Kelly. Your jacket is lovely – thanks for sharing x
LikeLike
Your jacket is just so perfect for all sorts of weather (being in Canada I can REALLY appreciate that!) I’m still in too awe of this pattern to make for myself to be honest. I just received Heather’s new pattern Ebony in the mail last week and I’m looking forward to making probably a few of those! Love the lining in your jacket and you’ve given some great advice here for those who will be making this jacket in the future. I loved Lauren’s too 🙂 Did you see Caroline’s made out of a shower curtain? Amazing 🙂
LikeLike
I love this jacket on you! I might have to think about making this pattern because I can see it fitting well into my wardrobe too 🙂 Thanks for sharing!
LikeLike
Wow, beautiful job! I’m moving from Hawaii to Utah soon (army family) and this is on my Make 9 list! Love how yours turned out 🙂
Nikki
http://www.pincutsewstudio.com
LikeLike
Your Kelly is awesome! Love the hardware. I’m planning on making a blue one with a plaid fleece lining. I was wondering how much of your fleece did you need to line the body and hood? I have no idea how much to buy.
LikeLike
Great coat. I’ve had my eye on this for a while but was a bit nervous about it…..looks like a pretty involved project (I’m just a beginner). However yours is amazing and looks like it was so worth the effort 😀
LikeLike
I love your version of this coat, still a pattern on my wish list. Thanks for listing your supplier info. How is the fabric on the coat holding up? It sounds a bargain at £7 a metre.
LikeLike
[…] love the style; the pockets are great (although, like Jen, if I made it again I would install the poppers so that they hold the pockets against the body of […]
LikeLike